When I was little, I loved going on trips. Even as a teenager and then a newlywed, I enjoyed throwing a few things in a suitcase and hitting the open road on a totally spur-of-the-moment whim. I liked going new places and meeting new people...
Until I had children. And now? Well, now I am perfectly content to sit at home all day and travel only as far as my two little legs will take me (which is usually about the distance of the couch to the bathroom and back again). I am seriously and sincerely impressed by moms who travel. I don't know how they do it. For. Real.
Here's the thing. I love being a mother. What I do not like is being a raving lunatic. What's the phrase that Tony Stark used in referencing The Hulk? "An enormous green rage monster"? Yes. That's it. That's me when I have to take my kids on trips.
Trips with children involve organization and planning and stamina...all things I lack these days. That's how I really feel. That having been said, I'm getting ready to embark on a 12-hr trip with all of my children plus the dadblasted cat. Oh, did I mention I will be alone (please, for the love of all things holy, do not point out that I won't really be "alone" because I will have all my kids. Just, do not.)? I didn't? Oh yeah, I'll be alone. A-L-O-N-E. There is only ONE positive aspect of taking this trip alone and that is that I can sing "On My Own" and it will be applicable. That's it.
So, in light of my upcoming road trip, I am going to say how incredibly excited I am about driving for twelve hours with six children. I cannot wait to hear them tell me about how they are hungry/tired/thirsty/bored/on fire/sprouting horns/turning into mini-green-rage-monsters. I am so looking forward to hauling six kids into a public bathroom and trying to leave without some sort of communicable disease. I know, I know, you're jealous. You wish you could take rage monsters on a road trip and contract Asiatic Llama Flu. Too bad for you, I get to have all the fun.
In all seriousness, my kids are actually pretty good sports most of the time, especially when you take into consideration that we rarely take road trips so they are not really acclimated to woes of the highway.
I plan to take exactly three things with me aside from the children.
1. Pants--Everyone will wear them and I will take extras should someone's need replacing.
2. Benedryl--Everyone will take some (aside from yours truly).
3. Cherry Coke--I don't drink caffeine, like, ever. No, I mean, not EVER. But since I have a small person who wakes up approximately seventeen times every night, it's either caffeine or crashing the car. I choose the caffeine.
What can I say? I'm a minimalist. Okay, I'm actually just a frightened mother who is scared silly to take her children on the open road with car crashes, flat tires and dirty public toilets lurking around every corner. It makes me want to crawl into a corner and hide, where it's safe and my kids are safe and no one is whining at me about being hungry or thirsty or bored...oh wait...never mind. This trip will be cake.

Showing posts with label Summer. Show all posts
Showing posts with label Summer. Show all posts
Sunday, August 11, 2013
Saturday, August 10, 2013
Camping Essentials For Kids
My husband and I are both big campers, we've been fortunate enough to be able to take our kids on camping in the summer. With a little trial and error we've almost figured out what we need for a successful trip. Here are my top ten:
1- Lots and lots of wet wipes! Grab what you think you'll need, then two more packs. After a long day of treasure hunting almost everyone needs a wet wipe bath before bed!
2-Outdoor friendly toys: Paint and brushes (for rocks, sticks, ect), Dump trucks, shovels, buckets, bug catchers, water guns, and kiddie fishing poles.
3- First aid kit. This seems obvious but many people forget them, and though I hope we'll never need it, it's nice to have.
4- Life Jackets, it's easier to relax and let your kids play in the lake when you know they're safe.
5- Flashlights, lanterns, glow sticks. For little ones afraid of the dark, late night walks, or to tie to your kid so they can run around in the dark but still easy to see. (Yes, we really have tied glow sticks to children before).
6- A portable potty. Midnight dashes to the camping bathrooms are no fun if your child hasn't learned to "hold it" yet.
7- Marshmallows, graham crackers and chocolate! You know why. Camping isn't camping, especially for kids if there are no S'mores involved!
8- Water, and plenty of it. It's one thing that isn't always easily available everywhere you camp and definitely something you and your kids will be need a lot of.
9-Extra blankets, no matter what time of year night can get chilly, especially for the kids. You'll want to make sure they're warm and happy.
10- Bug spray! Mosquitoes love little kids, it's hard for them to enjoy the trip while covered in bites, so make sure to use something that keeps the bugs away. I've heard rumors of dryers sheets working well. We personally use a ThermaCell, they work fantastic and you don't actually have to spray something on your child.
My last bit of advice is to let the kids get dirty, don't worry about it, it's one of the best parts of camping! Don't over-plan, and don't stress. Last of all, good luck! If you have any other tips feel free to share in the comments.

Friday, August 9, 2013
Travel Survival with the Tots
As a mom, I have a love-hate relationship with vacations.

On one hand
I relish the thought of a break from the normal day-to-day routines.
On the
other hand I fear the notion of the broken normal day-to-day routines.
The first vacation we took as parents was when Mini-me was six
months old. We went to the Bahamas. You could say we were new to this traveling-with-a-child thing.

The week before our trip, I was a neurotic focused, packing
soldier. I probably packed over a
hundred diapers for a four-day trip and brought every medicine known possible
(because any country outside of the U.S. doesn’t have these things, of course).
I packed extra sheets for the baby (because there was no way I was going to let her sleep on the hotel’s infant crib sheets), her bulky sponge bathtub, all types of Johnson & Johnson baby products, and like
5-10 outfits per day for her to be changed into, just in case she spat up or soiled herself multiples times.
She needed her own suitcase and I would even say, was ready for the apocalypse, should it happen.
During our trip, I also became the nap
nazi and made sure she took her naps at the same time, each day and
went to bed at her regular bedtime all while her sound machine lulled in the
background (because if naps and bedtime routines were missed, ALL would be lost
and our beautifully planned Bahamian-paradise vacation would be an utter
f-a-i-l-u-r-e). I am rolling my eyes even now as I type this.
There was a moment on our vacation when I asked myself, how the heck did it come to this?
Fast forward one year and a little bit after My-girl was born, we started planning another
vacation, this time on a smaller scale, and in our home state. I rethought my vacation planning strategy and decided that if I was going to keep my sanity, I needed to start my vacation off right by relaxing a
little more and thinking more clearly about how to efficiently AND effectively plan and enjoy a vacation with our two littles. After a few road trips and vacations under our belt, I've narrowed our vacation success tips down to this list:
1) Travel during nap times- Routine mayhem with toddlers is to be expected on a vacation, but
it doesn’t always have to start out that way. When possible, BBH and I
typically like to plan our road trips around our girls’ naps. We sometimes start driving around nap time or at least plan for their nap to happen during the drive. This has been so
helpful and our girls tend to be much happier and refreshed once we get to our destinations and start to catch up with our family.
2) Pack right –We try to keep our packing as light as possible. I honestly struggle with this, but BBH keeps me in check. I tend to stress out and end up over-packing for the kids, until I found this cool idea from All Things Simple. I will definitely be doing this while packing for our next vacation. You put your child’s entire outfit, including underwear and hair accessories in a zip-lock-gallon bag (for each day). When your child is getting ready, they can choose a bag and...bada bing, bada boom! Problem solved. This seems like it would be especially good for the child who wants to choose what they want to wear (I already have one of those on my hands).
 |
| Image credit: All Things Simple |
3) Well-Equipped Diaper Bag- My LL Bean diaper bag has become my purse
and acts as my emergency backup bag for the whole family. I love this diaper bag. It holds so much and is pretty gender-friendly, so BBH doesn't mind carrying it, either.

I pack extra diapers,
pull-ups, extra swim diapers, underwear, diaper cream, even more wipes, hand sanitizer, snacks (a couple of fruit snacks or granola bars, more healthy snacks and
lunch foods I put in their lunch boxes), extra cash, mints/gum, Advil, thermometer & children's/infant's ibuprofen, one-extra outfit for each daughter, sippy cups, and Kleenex. For some other ideas on diaper packing success, check this post out.
4) Travel totes- Each of my girls have their own travel bag for the
car.

We bought a couple when they went majorly on sale a year or so ago. I usually pack them with their favorite books, special items like their favorite
stuffed animal/baby doll, their lunch boxes, crayons, coloring books, small
puzzles, lacing cards, Doodle pads, the girls’ leap pad tag with their books,
etc. These totes stay in the back seat with them on the floor and we throw their toys and
stuff back in their bags when they're done.
Some moms have suggested bringing small Dollar store (like Dollar Tree) toys to
give to their kids at the beginning of each new hour as a reward for behaving
well in the car. We haven't done this yet, but will be trying it out in the future!
5) Music and Electronics- Our kids love to sing along to music in the car. We have several kids' music cds and it's gotten to the point where they take turns asking for a specific cd to listen to, even if we're going somewhere local, like the grocery store. We
also own a Kindlefire and love it. We've found all sorts of read-along books, and fun learning apps that the girls enjoy. We also have a couple of kid movies on it that Mini-me likes to watch.
6) Plenty of Bags- Bring extra plastic bags to wrap up soiled diapers, wet clothes, garbage…anything. Very helpful and I always feel like I need a few more while on road trips.
7) Food – On these road trips, our girls
each have their own lunch boxes and we try to pack them with healthier foods like fruits, sandwiches, cheese, personal cereal boxes or their snack cups filled with goldfish crackers. Earlier this year I was at blessed Target and bought a couple of those Fit and Fresh tupperware
for keeping fruit and cheese cold. They are awesome.
We also love these:

Have you seen them before? They are great for toddlers. They are called Munchkin snack "catchers". Thank you, Munchkin. SO helpful and useful with our kids.
Our kids love easy GoGo Squeeze applesauce on our road trips, too! We love anything easy and somewhat mess free!

8) Potty basics- If you have potty-training toddlers like we do and
know you’ll be on the road for a while, bring a portable potty, just in case
you can’t get to a restroom fast enough. On our next trip, we will be bringing ours and keeping it in the trunk. We always make sure to have extra wipes, toilet paper, plastic garbage bags, underwear or pull-ups/diapers and a towel for accidents.

Something we also bought when Mini-me started potty training was something called a
piddle paddle.

Such a life saver for ANY time we're in the car and even better during longer trips when it would be even more difficult to clean a car seat.
9) Expect the unexpected –I've had to learn that tot melt-downs are bound to happen. We can always count on fewer naps. And even if things go somewhat smoothly most days of our vacation and we're able to follow our normal routine, there will a day (or even two) when things do not pan out exactly the way we like.
But we survive. And we do it all over again. Because it is worth it.
The best lesson I have learned while vacationing with our kids is to savor the moments...
...like the first time we went on vacation to a beach house with Mini-me. It was amazing and so memorable for us as parents. Watching her curl her toes curiously in the sand and laugh while she jumped in the waves still makes me smile whenever I think of it.
A year later we took both our sweet girls on a similar vacation to enjoy the same beach. We then watched as My-girl made the same wonderful discoveries. As she and I snuggled together while watching the waves dance on the shore, it made me realize more that time with them is precious and fleeting.
And these are the moments I relish.

Wednesday, August 7, 2013
Fun Staycation with Your Kids: Via Hot Air Balloon

First, if you and the kiddos want to truly feel
wild and free, you have to really commit.
THE COMMITMENT:
Time-Out
Get your family together and collect all of the
clocks in your home! Make it a speed race! See who can collect the most! Stash
them in a designated “time-out” box. Tuck the box away in the least visited
closet. You know, the one you dread to
think about. The one that is in desperate need of an “organize-a-makeover.” Don’t
forget to toss your watch in there while you’re at it! In doing so, you’ll toss
away the stress of the daily grind. For you staycation, you’re no longer a
prisoner to time!
THE PLAN
Plan your global route:
What better way to build up the anticipation than
to plan your exact route around the world? And what better way to do so than
with a little arts and crafts!
Here
are two fun options:
Easy
DIY World Globe
Here is a wonderful DIY tutorial I found online:
Or
Easy
Antique World Map (that you find under the magical
time-traveling tree in your backyard, perchance?)
National Geographic’s website offers great free map
pintables! You get to choose how detailed they are prior to printing!
After you print your map, color it with antique
like faded colors (browns, light pinks, sea foam green) or if you don’t think your
little one will be able to tell the countries apart, make it a bright and
colorful antique map that is kid-friendly.
Once colored in, singe the edges with a lighter or candle. Drop some
candle wax on it here and there. Write a secrete message on the back or corner
of the map in a foreign language. Here’s an idea!
“If you have found this map you are
special and will partake in great world adventures.”
In French:
“Si vous avez
trouvé cette carte vous êtes spéciaux et participerez à de grandes aventures
mondiales.”
Get out your red ink pen and draw out your preferred
route! Label the destinations with the dates you will be traveling there.
Stuff that suit case!
Gather the little ones and pack all of the
essentials: favorite blanky, favorite action figure, favorite stuffed bunny,
etc. Packing is so simple when you’re not actually going anywhere! Oh, and
definitely don’t forget to pack your furry friend’s pretend luggage too! You can
let youngest be in charge of this important responsibility!
Safety
First:
Traveling with
kids can be a little scary. Here are some tips to make your staycation travels
safe.
Imagine a world with no evil. No monsters. No crime. Just friendly
people. Warm smiles everywhere you look. Safety: Check! Staycation rocks!
I TRAVEL BY WAY
OF...
Decide (via majority vote) the best form of
transportation. Some planning ahead could make this trip unforgettable! For hot
air balloon traveling, buy a dozen or more (you’ve got to make an impact) helium
balloons and curly gift ribbon (or string). Tie long strands of ribbon (let the
balloons touch the ceiling) on the balloons and attach them to the outside
edges of a large box (big enough to fit the crew) with tape.

Make sure you tie down your hot air balloon when
you’re not actively traveling! You don’t want it to fly away without you! Each
time you’re ready to hit your next destination, climb everyone on board, untie
the safety knot weighing you down, and let the wind lead the way! (Other forms of travel include: jet ski, steam
boat, submarine (the little mermaid might just join you), time traveling
machine, camels’ backs, etc.)
Sample Itinerary for Paris, France:
-Put on your berets. Board hot air balloon. Travel
to Paris, France.
-Shout“bonjour” to the gigantic, spotted whale splashing in the blue ocean below and “à plus tard” to the majestic bald eagle flying by boldly to your right! Visit the capital of every country you decide to visit. For every country, learn how to say “hello” and “good bye” in their language. Eat a country-appropriate meal and wear a country-appropriate hat! Adopt an imaginary pet, like an elephant or a penguin! Watch a foreign film classic!
-Shout“bonjour” to the gigantic, spotted whale splashing in the blue ocean below and “à plus tard” to the majestic bald eagle flying by boldly to your right! Visit the capital of every country you decide to visit. For every country, learn how to say “hello” and “good bye” in their language. Eat a country-appropriate meal and wear a country-appropriate hat! Adopt an imaginary pet, like an elephant or a penguin! Watch a foreign film classic!
-Sun-rise (no clocks or watches, remember?): Hot
air balloon lands on the Eiffel tower (discuss the history of the Eiffel tower).
You’re still so high off the ground! Good thing you brought your parachutes!
(Make
every meal a picnic!)
-Petit déjeuner (Breakfast) Picnic Options: Pain au
chocolat (buttery pastry with melted chocolate swirled through out) or Croissant with butter and fresh jam with
hot chocolate for dipping! Buy it or make it!
-Learn “hello” and
“good bye” in French: “bonjour”or “salut” and “au revoir”
Greet each other
with new learned words!
-Déjeuner (Lunch) Picnic: Saucisson en croute (puff pastry wrapped
sausage) Super easy!
-Adopt a poodle! Name
him! Groom him! Feed him!
-Dîner (Dinner):
French onion soup with a fresh baguette
-Watch a kid
friendly French film!
"La
Belle et la Bete" (Beauty and the
Beast)
Directed
by Jean Cocteau. “This is a
live-action black and white adaptation of the French fairy tale. This film
has a lush and beautiful art design and is easy to follow for children even
though it is spoken in French and has English subtitles.”
–screenjunkies.com
Listen to French music as you fall asleep. Whisper “bonuit”
(goodnight) as you all snuggle comfortably in the living room, on the couch, in
sleeping bags, on pillows and mattresses on the floor.
Travel back home in the morning!
When
the time is right, and the budget is too, you’ll travel the world. For now, be
close, be creative, and have fun!

Tuesday, August 6, 2013
Toasted Perfection
109 degrees.
That is what the intersection's large thermometer read today.
Thankfully, Dallas has lucked out so far this summer and has had almost no humidity.
It's amazing.
I can so handle 109 degrees if it's humidity free.
Actually, I can also handle 109 degree summers, even with humidity, if it means 60 degree winters. And sunshine. And no snow.
See, not only do I typically struggle with Postpartum Depression, I have SAD: Seasonal Affective Disorder. And snow with SAD? Well, they go hand-in-hand. And not in a good way.
Here's the thing with lawyers, they have to take "the Bar" in a particular state, and if they pass the Bar they are certified to practice law in that state only. Brandon and I were faced with an interesting dilemma during the middle of law school: where did we want to live for the rest of our lives? (well, the rest of his working career).
Because the California blood runs deep in my husband he is not a "snow person". (Frankly, can a man get more attractive? I think not). I, having grown up in the nastiness that is snow and finding myself sinking into deep despairs during winters in Kansas (where my husband went to law school), knew that I, too, am not a "snow person". This fact helped greatly in our choosing of a state in which to live.
Texas summers may be a bit brutal, but come October November things start to cool off and this becomes a glorious land. I'm willing to sacrifice some sweat and wilted hair if it means t-shirts and jeans in January.
My summer tip revelation? No one place is perfect all year round (although Monterey is about as ideal as it gets). Embrace your home. If you truly can't handle cold winters, then be prepared to get crisp in toasty summers. And if heat isn't your thing, buy some snow shoes and move to New England.
Choose What You Love
Love What You Choose
For our family we greatly sacrificed being near any extended family and countless other things just so this Mama could stay warm and happy. (Because if Mama ain't happy...). People are faced with decisions every day, some big while others are small. Regardless, trust your gut. Trust your experiences. Nothing is ever perfect. But Texas is mighty close. So I suggest you move here. Pronto.


Monday, August 5, 2013
Six Sunny-Day Diaper Bag Items
Fun in the sun…
When I was little- I remember my stay-at-home-mom taking
full advantage of the Florida Sun year round planning activities for my
brothers and I. We went to parks, the
springs, lakes, you name it! We basically lived at the beach. And for awhile- we even had SEASON PASSES TO
DISNEY WORLD!!!!
I mean- holy cow. Can there be anything cooler when you’re
a kid? Methinks not.
 |
| {My brothers and I covered in fake snakes at Animal Kingdom- looking appropriately terrified.} |
 |
| {This is when I was older and I actually had to save-up to go to EPCOT, but Disney never gets old. I'm the one on the right and my friend Skye is on the left- plus there's another TETO author Mandi in the middle. We are so cool. She better not take this down.} |
Now as a mother of my own- I work. I lament not being able to attend playdates
at the zoo, the splashpad, someone’s backyard.
When summertime finally rolls around I find myself sunken into my “me-shape”
on the sofa and unwilling to get up for more than the occasional food/potty/toddler-screaming-and-needs-chocolate-milk-now
break. I’m sure a lot of this has to do
with having a newborn. (That’s what I tell myself anyway) but either way I
still feel pretty bad.
My poor little toddler is corralled in our apartment
watching the 1123rd episode of Sesame Street streaming on Netflix
for the 1123rd time. (At
least he gets all the graham crackers he can eat…right?!)
Anyhow- we HAVE managed to get out of the house one or
two times. With two kids I’m finding it’s
becoming even more important to really be prepared.
When Graham was a newborn, I did the typical
first-time-mom thing and went ALL-OUT with his diaper bag. (I’m talking like five receiving blankets…kind
of ridiculous.) By the time he was 18 months we were usually pretty good with an
extra diaper and a thing of wipes shoved into my purse.
During my pregnancy I found things started to be a little
more difficult. The first time I’d
walked around the pregnancy block I didn’t have a toddler. It is a totally different game. The first time you’re tired because you’ve
never done this before. It’s all
new. Every ache, every discomfort, every
flutter- it’s a big deal! And it’s exauhsting.
The second time around I worried less about whether or not my feet were
swollen, and more about whether or not Graham was getting his basic food groups
4/7 nights a week. I worried less about my pregnancy-induced eczema and more about
squeezing in those bedtime stories. The
second time around it’s not only about the baby in your belly- but it’s about
the baby outside your belly too. That
leaves a lot less “about” for you.
But I’m getting off-track. The point I’m trying to make, is that when I
got pregnant we started to emphasize the preparedness factor again. I needed more water- and Graham would see me
drinking so of course he needed a drink too.
I walked a little slower so grocery-runs took a little longer and we
needed some fruit-snack gummies to keep him occupied. It took a little more time to get out the
door, but once we were out, everyone was a LOT more happy.
Now that Xander is here, we’ve switched from an
over-the-shoulder diaper bag to a backpack.
It’s nothing fancy (just the free one we got at the hospital) but can I
tell you what a LIFESAVER it is having both arms free?! This is especially true if Hubby isn’t around
and I need to carry both boys. Amazing.
Now when we’re out and about, there are a few things this
mama wouldn’t want to be without.
(…that kind of rhymes. I’ll pretend I did it on purpose.)
Six Sunny-Day Diaper Bag Items
1.)
A Clean Sippy.
Graham isn’t too thrilled with
sippy-cups anymore, but it sure makes my
life a whole lot easier. We should
probably try giving him a straw-cup of some kind instead, but the sippies are
still working for now.
Sometimes if we know we are going
somewhere (like church or Grandma’s) we will just bring an empty cup. But this post is about fun in the sun- so let
me tell you I would fill that bad-boy up with some good old fashioned
water. Water is WAY better at quenching
thirst, not staining clothes, and not going nasty in the diaper bag if you
accidentally leave it in there after your sunshine-filled-fun is over. (I won’t judge!)
And let me remind you, Moms and
Dads get thirsty too so it’s always a great idea to bring a big water bottle of
your own. I have frequently had one that
served the main purpose of re-filling Graham’s cup and ended up taking a few
swigs myself.
2.)
More Diapers! (and wipes)
I doubt I need to tell any mamas
out there that it’s a good idea to always bring one or two more diapers than
you think you’ll need. In reality- you
won’t need them. You really won’t. BUT
if you don’t bring them- your child will magically become the fountain of youth
in his or her pants and you will end up with a soaked carseat and a soaking-wet
screaming child. I hear it happens.
Also, some of us aren’t too great at re-stocking our diaper bags and it’s always great to have a buffer of some extra diapers from the last time in case you totally forget to grab some this time.
Also, some of us aren’t too great at re-stocking our diaper bags and it’s always great to have a buffer of some extra diapers from the last time in case you totally forget to grab some this time.
3.)
Extra clothes
Something I actually learned as
a teacher before I was a mom- is that it’s always good to have an extra shirt
(and pants if possible) for YOU… just in case.
A lot of moms use common sense to stick an extra onesie in the diaper
bag for their baby, but I go ahead and throw a t-shirt in there for me too. Babies aren’t the only ones getting covered in
spit-up or soaked when there’s a diaper explosion. Being out and about is bound to be WAY less
stressful if you’re comfortable, and I don’t know about you, but NOT being wet
and stinky is always a plus for me.
And while I’m throwing clothes
in the diaper bag, I stick an outfit in there for my toddler too. I usually go with something simple and light
that won’t take up too much space and will “work” in any location. (So probably
not footie pajamas. Think tshirt and
shorts.)
4.)
Hand Sanitizer
Baby wipes are fantastic at
giving you a quick hand-wash if you’re grabbing lunch, but sometimes it’s nice
to have that extra “sanitization” factor- especially if you’re somewhere like a
theme park and your child has been hanging off of every hand-rail he or she can
reach; after every weirdo under the sun has wiped their snotty fingers all over
it. (I speak as the girl who set her
hand in a pool of fresh mucus while waiting in line for Buzz Lightyear many
years ago.) There are tons of cute little
mini versions available so this shouldn’t take up too much space or be too inconvenient. You can even buy a big one to keep at home
for refills when your to-go size starts running low.
5.)
Snacks
Ah. My favorite. Snacks snacks snacks. They will save your child from apparent-starvation,
and you from apparent loss-of-sanity. We
like to just have a few mini Tupperware containers of different snacks to help
switch things up. I like to have a
variety of sweet and salty and we try to go for more filling options. (Graham crackers broken into fourths, Nilla Wafers,
Goldfish crackers, club crackers, dry cereal, fruity marshmallows, pretzels,
etc…) Graham loves fruit gummies but I
hate having to deal with the wrappers after he’s eaten them. (Remember what I said about valuable
real-estate? Every nook in that bag is precious!)
6.)
Sunscreen
I really have failed on this
one. But I have the best of intentions
and I vow to be better! When I was
little- my mom would always slather us in sunscreen before we went to the
beach. And I had to keep on my
shirt. That was lame. I hated it.
But now as an adult who can clearly see the horrific effects of skin
cancer, I am SO GLAD I was forced to be
lame.
While I’m great at sun-screening
it up for Graham at the beach (Xander hasn’t been yet), I’d really like to get
better about making sure he has it on anytime we are going to be outside for
more than a dash from the car. I feel
like actually having it IN the diaper bag would make it a lot easier for me to remember.
I used to keep some Aveeno baby
eczema lotion in the bag when Graham’s skin was breaking out, but he seems to
be growing-out of his eczema (fingers crossed!) so I haven’t recently. (That’s
valuable real-estate! Be prepared- but don’t carry more than you have to mama!)
 |
| {There are two of my elementary school friends looking way cool in their swimsuits on the beach and my brothers and I in our t-shirts on over our swimsuits. I had enough sunburns in my teens to leave me cowering under a blanket and umbrella when we go now though. My boys are lucky- Graham has some of those cool new sunscreen shirts and I'm totes jealous that we didn't have those.} |
Honorable Mention Items:
-Hair-ties/clips for mom!
-Pacifier (my boys don’t usually
take one but we have it just in case)
-Socks for the kids (addresses
blisters and/or chilly feet if you get wet and they are riding home in the A/C)
-Cell phone charger (Maybe it’s
just because I’m addicted to technology, but everything goes a lot smoother if
mom knows she isn’t going to be stranded somewhere with a dead cell phone.)
-Gripe Water/Baby Tylenol/Band-Aids/Other
meds (Holy goodness. Yes. Yes. Yes. This
should probably actually go on the regular list. Gassy babies, unexpected
teething, allergic reactions- these are all major fun-killers. Your day out will end quickly or be
incredibly miserable if you don’t have the necessary remedies.)
-A favorite toy (for
entertaining during car rides, lines, etc… Don’t go overboard on the toys or
bring a REAL favorite because it is entirely possible it will get lost and be
gone forever.)
Ok this post is getting
ridiculously long and it’s close to midnight so I’m off! Thanks for dropping by, please come back and
read the rest of our Fun in the Sun posts this week!

Sunday, August 4, 2013
There Will Always Be Cake

First, let me start off by saying that I am so excited to be
the guest today! I love “To Each Their Own” and enjoy reading seven different
points of view each week. Some of these stories have been exactly the kind of
encouragement I needed, while others have brought me to tears. I look forward
to more great, wonderful, emotional, and exciting tales from these ladies.
So, with all of the “mushy” stuff out of the way, let’s get
down to it!

I’m Courtney! I’m a food blogger,
a full-time student, a photographer, a writer, a wife, and a mother of two wonderful little boys
(ages 6 & 4).

With all of that said, I should add….I am an overachiever. Bring
on the pamphlets, buttons, twelve-step programs, and support groups, anything
that might keep me from committing myself to far too many things. But until
that day comes, there is cake. There will always be cake.
When my husband and I first got married, nearly eight years
ago, we were newlyweds for just a short while before our oldest graced us with
his presence.

In that time we were trying to find our footing together,
learning each other’s habits, likes, dislikes, and more than anything each
other’s family traditions. So when my husband first mentioned the idea of “Jell-O
Cake” one night over dinner, I gave him a side-eye and convinced myself that
such things were just not appealing.
Oh, how very wrong I was.
He walked me through
it, as I sat shoveling spoonful after spoonful of mashed potatoes into my
mouth. “it’s cake and then Jell-O, instant pudding, and whipped cream” he said enthusiastically.
This was a childhood dish he adored. “You
want me to put Jell-O in the cake?” I asked. “Yes”.
Okay. I can do this.
Mix a box of Jell-O flavoring into cake, people put pudding mix in cake all the
time, it’ll taste like strawberries.
“Why don’t we just buy
strawberry cake mix” I asked. “No, no, no” he stopped me. “You have to make the
Jell-O first”.
Hold up. Wait a
minute. TIME-OUT. NO.
“Liquid Jell-O…..dumped
over the cake?!?!?!” I was a little more than confused and hoping I was so
very, very, wrong.
“Yes”.
“No”.
“Yes”.
“Just no.”This went on for a
while.
“Trust me” he said,
“it’s good”.
And trust I did, because the next night I found myself in the
kitchen trying to surprise my new husband with his favorite dessert. I read all
the instructions on the packages, baked up two round vanilla cakes from
scratch, poked holes in the layers, poured my Jell-O, then pudding between the
layers, and whipped cream over the whole thing like frosting. I took my
masterpiece, placed it on a cake stand, and set it in the middle of the dining
room table.
I have to admit, it
was beautiful. It was a gorgeous cake.
My husband came home
and said, “You made cake!” I smiled.
“What kind” he asked. I frowned, “Jell-O
cake”. Couldn’t he tell?
He gave me a sideward
glance and grabbed the knife from the table. He pulled a slice out, pronounced
it was delicious, and I beamed.
I made cake. I made
Jell-O cake.
The next Christmas, as
the family gathered together in celebration, there was cake, Jell-O cake, as per
my new husband’s family traditions. I stood in the dining room of my in-laws
looking at a 9 x 13 inch pan of “Jell-O cake”. And that’s when I realized:
I am an overachiever.
Sizing up this 9 x 13
inch pan, this monstrosity of goo, this one sheet wonder, I realized…Jell-O
cake is not meant to be pretty. It’s not meant to be a two-tiered tower of
whipped cream and vanilla cake made from scratch. It’s meant to be layered into
a pan, one cool layer on top of another, in one giant heap of yummy goodness.
It’s not carefully planned, it’s not meant to be decadent, and it’s just meant
to be eaten. It is meant to be comforting, something you don’t have to slave
over or make sure all the cream is whipped just right. Because no matter what,
no matter which way you make it, Jell-O cake will love you and you will love it
for loving you just the way you are.
Trust me.

Jell-O Cake
makes one 9 x 13 inch pan
1 Box of Yellow/White/Vanilla cake mix
1 Box of Vanilla Instant Pudding (Small box or large, your
choice)
2 small (or 1 large) box of Strawberry Jell-O
Whipped Cream (or cool whip)
Ingredients for the mixes (eggs, oil, milk, water, etc)

Make the pudding first. Mix the powdered mix with the milk,
place in a bowl and refrigerate.

Next mix together the cake mix.

Place the mixture into a 9 x 13 pan. This is going to be
your serving vessel so if you want something to serve in that’s pretty, choose
the pan now. Bake the cake as directed. After the cake is done baking, let it
cool for about 20-30 minutes.

While the cake is cooling, mix together the Jell-O. DON’T
COOL THE JELL-O YET!!!!

Then, take something
sharp and get all your anger out…stab a TON of holes into the cake. I use a
kabob skewer, in the past I have used forks, knives, straws, back of the spoon,
etc.

Pour the Jell-O you just made over the cake…yes the whole
bowl.
I know it looks like a lot of liquid, but trust me, the WHOLE
bowl!

More likely than not you will end up with Jell-O resting on top of your cake...it's fine...it will sink into the cake, I promise!
Next chill the cake for about an hour.

Then spoon the
vanilla pudding over the whole thing, then the whipped cream. Either make fresh
whipped cream (like I did) or use cool whip (which is more traditional).
Finally let the whole thing get nice and “happy” in the
fridge for at least two hours. You can make this in the morning if you’re
serving it that night, or make it a day ahead. Either way, this whole thing
needs to be kept in the fridge and is meant to be eaten cold.

Slice and serve! Enjoy!
If you liked this
recipe, come check out all the other delicious goodies over at A is for Abel

Saturday, August 3, 2013
Easy Baked Salmon
We eat a lot of fish in the summer, so that's what I think of when I hear "summer recipes". My husband fishes all summer and I cook it up. So... here is one of my favorite Salmon recipes. :)
I apologize in advance to those of you who are perfectionists, I didn't measure
anything, I rarely do. Just add this and that until it tastes good. Ha ha. I'm fairly certain you can't mess up this recipe.
You will need:
Dill Weed
Lemon Pepper
Paprika
Garlic Powder
Onion Powder
Mayonnaise

Mix it all together to taste

De-bone
your Salmon and put it skin side down in a pan covered with foil that's
either non stick or been sprayed with cooking spray. Then spread your
dressing mix onto the Salmon, as much or as little as you want

Bake at 350 for 25-30 min or until Salmon flakes easily. Enjoy :)

It's fast easy and delicious, my kind of meal!

Friday, August 2, 2013
The S'more the Merrier
When I think of summer recipes (especially sweet treats) I
think of the gooey, delectable, chocolatey-marshmallowy-grahamy goodness of a S’more. It is probably one of my all-time favorite summer treats. Ok, let’s be serious here. It’s one of my
all-time favorite, ALL-YEAR-ROUND treats. I really can’t get enough of them.

I can’t remember
exactly when my taste buds were introduced to this gorgeous, gooey goody but I
was probably around 12 or 13. I do remember it was at a church youth activity we call firesides, where a member of our church would share a positive, devotional/spiritual
message to the teenagers. When I discovered them, I couldn't get enough of them and since then, anytime someone looks at me and says they haven't tried a S'more, I feel like Ham from the movie Sandlot and want to scream "You're killin' me, Smalllss!" (If you see a ginormous space below, it's because your phone doesn't let you see this epic youtube video. Kinda annoying and since I don't know how to fix it, just click on the "You're killing me, Smallls" link above if you're dying to see how a s'more is made). ;-)
Due to my love of S’mores, I have found myself looking for different ways to enjoy them. The idea of a S'more Cookie bar made it's way to my pinterest page and after making several different
renditions of the treat and tweaking to perfection, I am done looking for recipes and I am done tweaking. If you love S'mores you will die and go to HEAVEN with this recipe. Here it is:
S’mores Cookie Bars
Ingredients:- 1 stick of REAL, salted, softened butter (1/2 cup)
- 3/4 cup of granulated sugar
- 1 cup graham cracker crumbs
- 1 egg
- 1 1/2 tsps. vanilla extract
- 1 tsp. baking powder
- 1 1/3 cups all-purpose flour
- 1-2 cups marshmallow cream (I use marshmallow "Fluff").
- 18-20 small Hershey milk chocolate bars (or 5-6 regular sized ones).
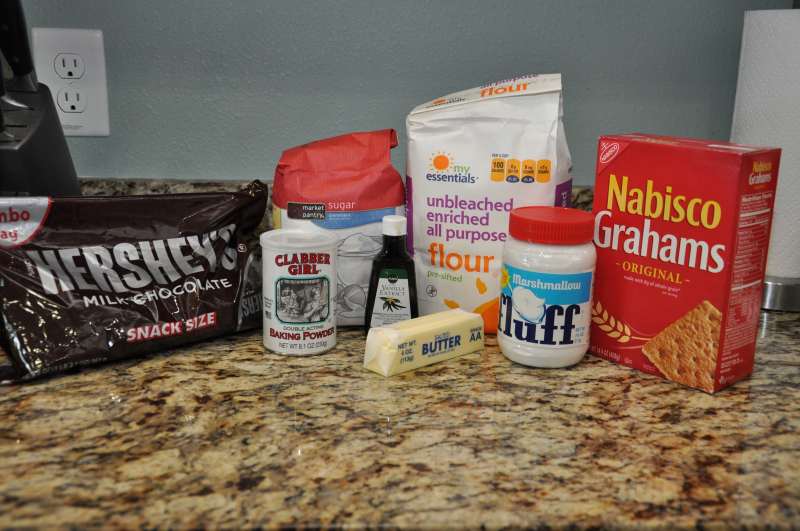
Note to selves: There are four ingredients in this recipe that you should never substitute: 1) REAL butter, 2) brand-named Graham crackers (I love Nabisco Original Grahams), 3) Marshmallow Fluff- Not Marshmallows (I know, I know but I'm telling you, the Fluff is the way to go), and lastly, 4) REAL Hershey Milk Chocolate bars, because hello, we're making S'mores here.
Ok, let's go!
First: In a large mixing bowl (I'm using my kitchen aid here, but you can use a hand beater), mix that softened, REAL butter with the sugar until light and fluffy.

Second: Beat in the egg and the vanilla extract.

Third, you can buy pre-made graham cracker crumbs, but I typically just put one whole package of graham crackers in a gallon-sized ziplock bag and use my rolling pin to crush to crumbs. Unless...(ahhh- enter choir of kitchen angels) you have one of these babies:

Here is my new Cuisinart Food Processor. (You know life has changed when getting new kitchen appliances makes me happier than, well, happier than this cute guy):
.jpg)
Next, Add your dry ingredients: the flour, graham cracker crumbs, and baking powder.

Fifth, in a greased 9 inch square baking pan, press half of the cookie mixture evenly into the bottom of the pan. Unwrap the Hershey bars and place them on top of this amazing graham cookie crust.

Around this time, Princess Mini-me arrived in the kitchen to see what was going on. I'm telling you all, this
child can hear the unwrapping of a chocolate candy bar like A MILE AWAY. She is always willing to
help with the chocolate part. (P.S. She would not take her Snow White dress off all day. New
development for us.


Ok, so after you place the chocolate on top of the crust, and using a knife or a spatula, spread the
marshmallow cream (fluff) ON TOP of the Hershey bars. This can sometimes be a little tricky as you have
to make sure the Hershey bars don't move around too much. But I have a trick to overcome this.
Just.add.MORE marshmallow cream! Hey, the S'more the merrier, right?
marshmallow cream (fluff) ON TOP of the Hershey bars. This can sometimes be a little tricky as you have
to make sure the Hershey bars don't move around too much. But I have a trick to overcome this.
Just.add.MORE marshmallow cream! Hey, the S'more the merrier, right?

After this, take the remaining graham cracker cookie mixture (from the bowl) and crumble or "dot" it on top of the Marshmallow cream. (At this point, we got kind of excited in our house and forgot to take a picture).
Then, bake in a pre-heated 350 degree oven for 25-30 minutes, or until golden brown. (Also not pictured because we seriously ate them as soon as we took them out of the oven).
Once done, let cool for 10-15 minutes. The first time we ever ate these, we served them warm and with this yummy Breyers S'more ice cream on top. Like I said, the S'more the merrier.

Yup. Pure awesomeness that night. We spare no calorie here. Or, you can just eat them warm. BBH actually likes to let them cool a little more so that he can enjoy them as an actual cookie bar. I like that, too.
 |
| First picture of the final product |
 |
| 2nd picture of the final product. Umm..apparently BBH is much better at "staging" food than I am. |
If these babies last, you should store them in an air-tight container. The recipe should make about 18 bars for a normal, disciplined person. Naturally, this would not be me. So who knows how many bars this makes in the K home.

And folks, just so y'all know…National S’mores day is on August
10th…another reason to make it this month, yet again. Enjoy!

Subscribe to:
Posts (Atom)